

As a recruiter, outreach and follow-up are at the core of your position, but they both involve a lot of tedious, manual, monotonous labor in order to do it right. Fortunately, lots of “secret” tools are out there that could help take away some of that touch work. Mail merge from Microsoft Word or Excel is one excellent example.
What Is Mail Merge?
Looking to customize a document, such as an email or newsletter? A mail merge is the answer. With a mail merge, you can instantly and automatically personalize any number of documents for all of your recipients, sparing you lots of manual labor.
For instance, if you’re sending cold emails, you can use a mail merge to add a unique greeting, mention each candidate’s name, and even include their job position, company, and other relevant details. That means you just need to type up a template first, and a mail merge will instantly insert all their info from a spreadsheet. In other words, it’s a massive time saver.
How to Use Mail Merges
The first step to using mail merge is getting the two components setup. The first is the template file, which is the document you send out (such as your email) with the placeholders where you want to insert the personalized data and the second is the data file, which is a Microsoft Excel spreadsheet or Google Sheets file where you organize the personalization data.
When you open your template file in Word or Excel and navigate to the Mail Merge feature, it will prompt you to select the location of your data file and it will do the rest of the work for you, filling in the placeholders of your template with the data for each recipient and generating a personalized email or letter for everyone in your list.
What: Mail Merge is the process of compiling a list of a large amount of contacts that you want to email all at once instead of one at a time. You are able to somewhat personalize your messaging with a mail merge which is highly recommended as you do no’t want to come off as spamming candidates.
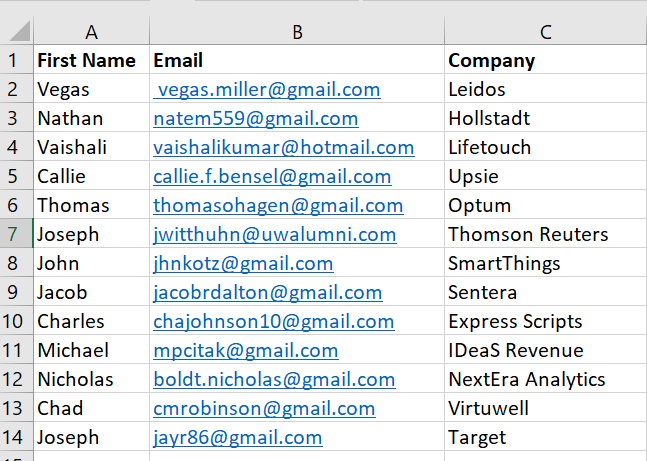
Preliminary Work: Compile a list of all of the candidate’s information you want to reach out to in excel. You must include first name and email at a minimum, but may add other personalized filters such as current company, skill set, location, etc.
Example:
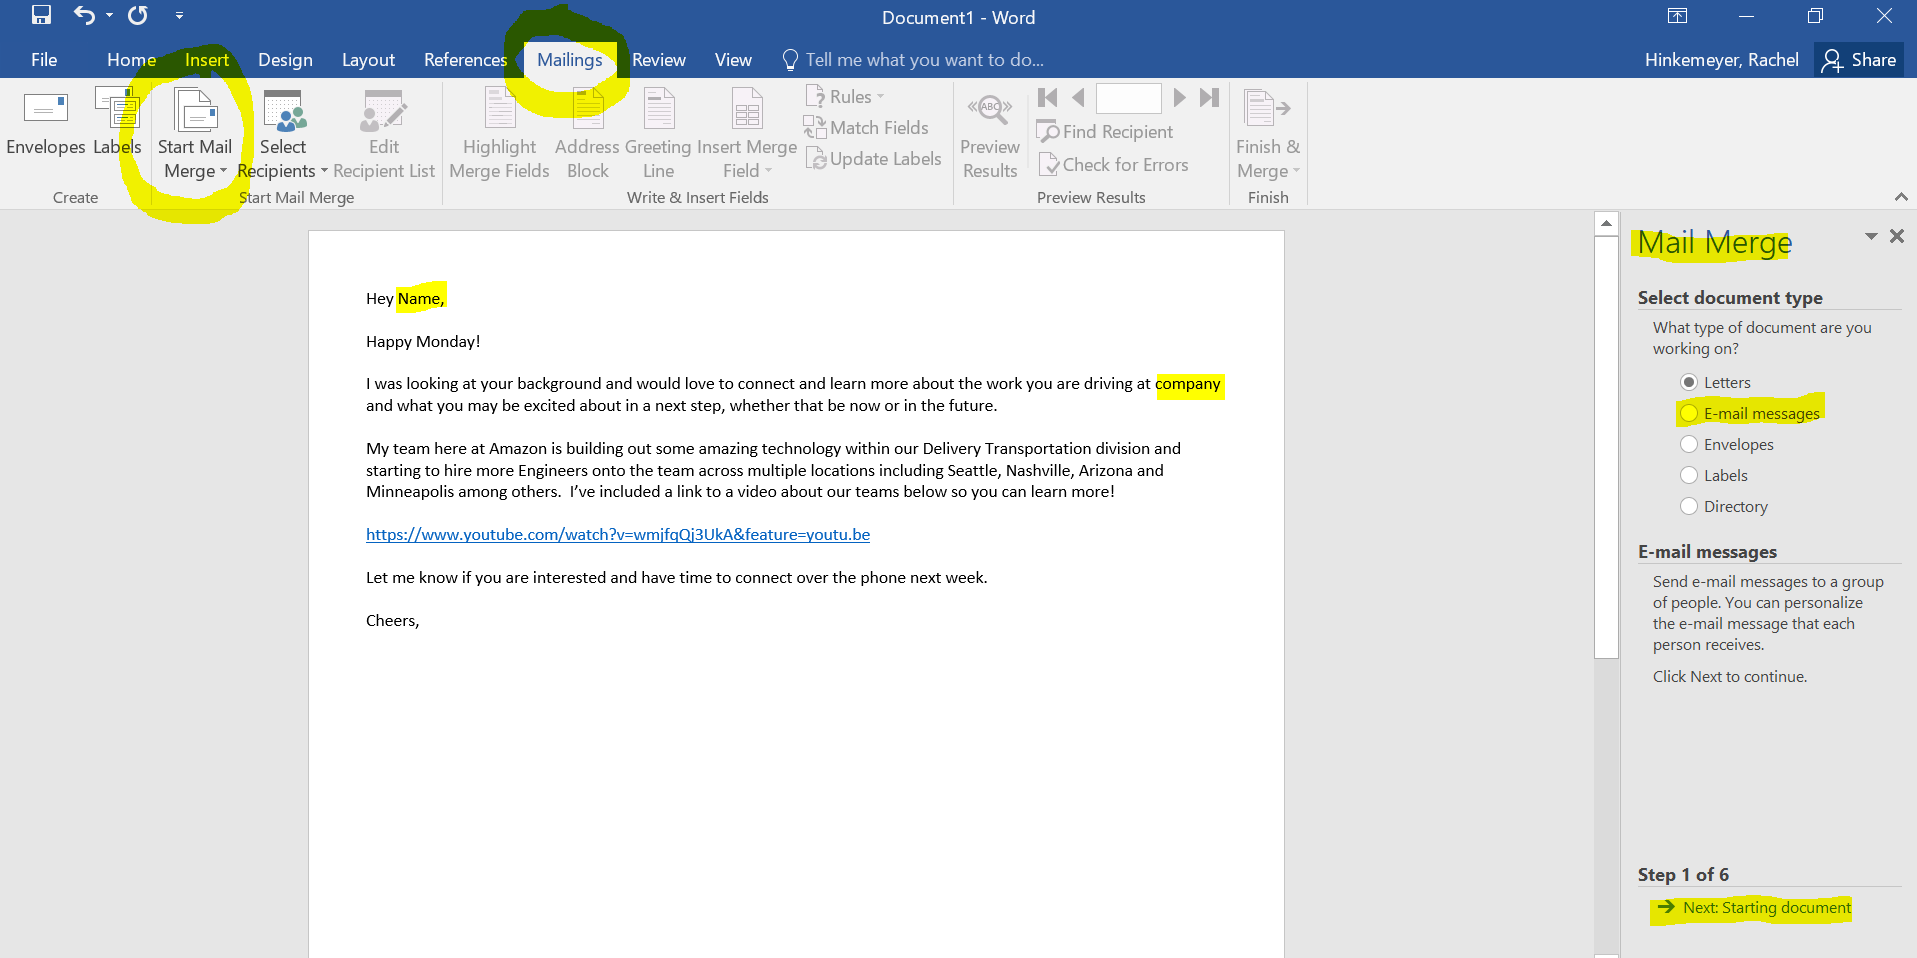
Step 1: Once you have all of the candidates you wish to email in your excel spread sheet save the document and open Microsoft Word. Insert the template you wish to use for the body of your email and add in the column names where your personalized information will go ( name, company, etc.)
Once complete, on the top click “Mailings” and then “Start Mail Merge” and then from the drop down hit “Step-by-Step Mail Merge Wizard.” Once you hit “Step-by-Step Mail Merge Wizard” a column titled “Mail Merge” will appear on the right-hand side. Click “E-mail messages” and then click (step 1 of 6) “Next: Starting document” at the bottom of the screen.
Step 2: Click (step 2 of 6) “Next: Select recipients” at the bottom right.
Next, click “Use an existing list” and then hit “Browse” to find and double click the Excel document with the contact information you compiled initially.
Once you double click your document a window titled “Select Table” will pop up, click “OK.”
Next, another widow will pop up titled “Mail Merge Recipients”. Assure the column headers are correct (Name, Company, Email, etc.) and then click “OK.”
Step 3: On the bottom right of the screen (Step 3 of 6) click “Next: Write your e-mail message”
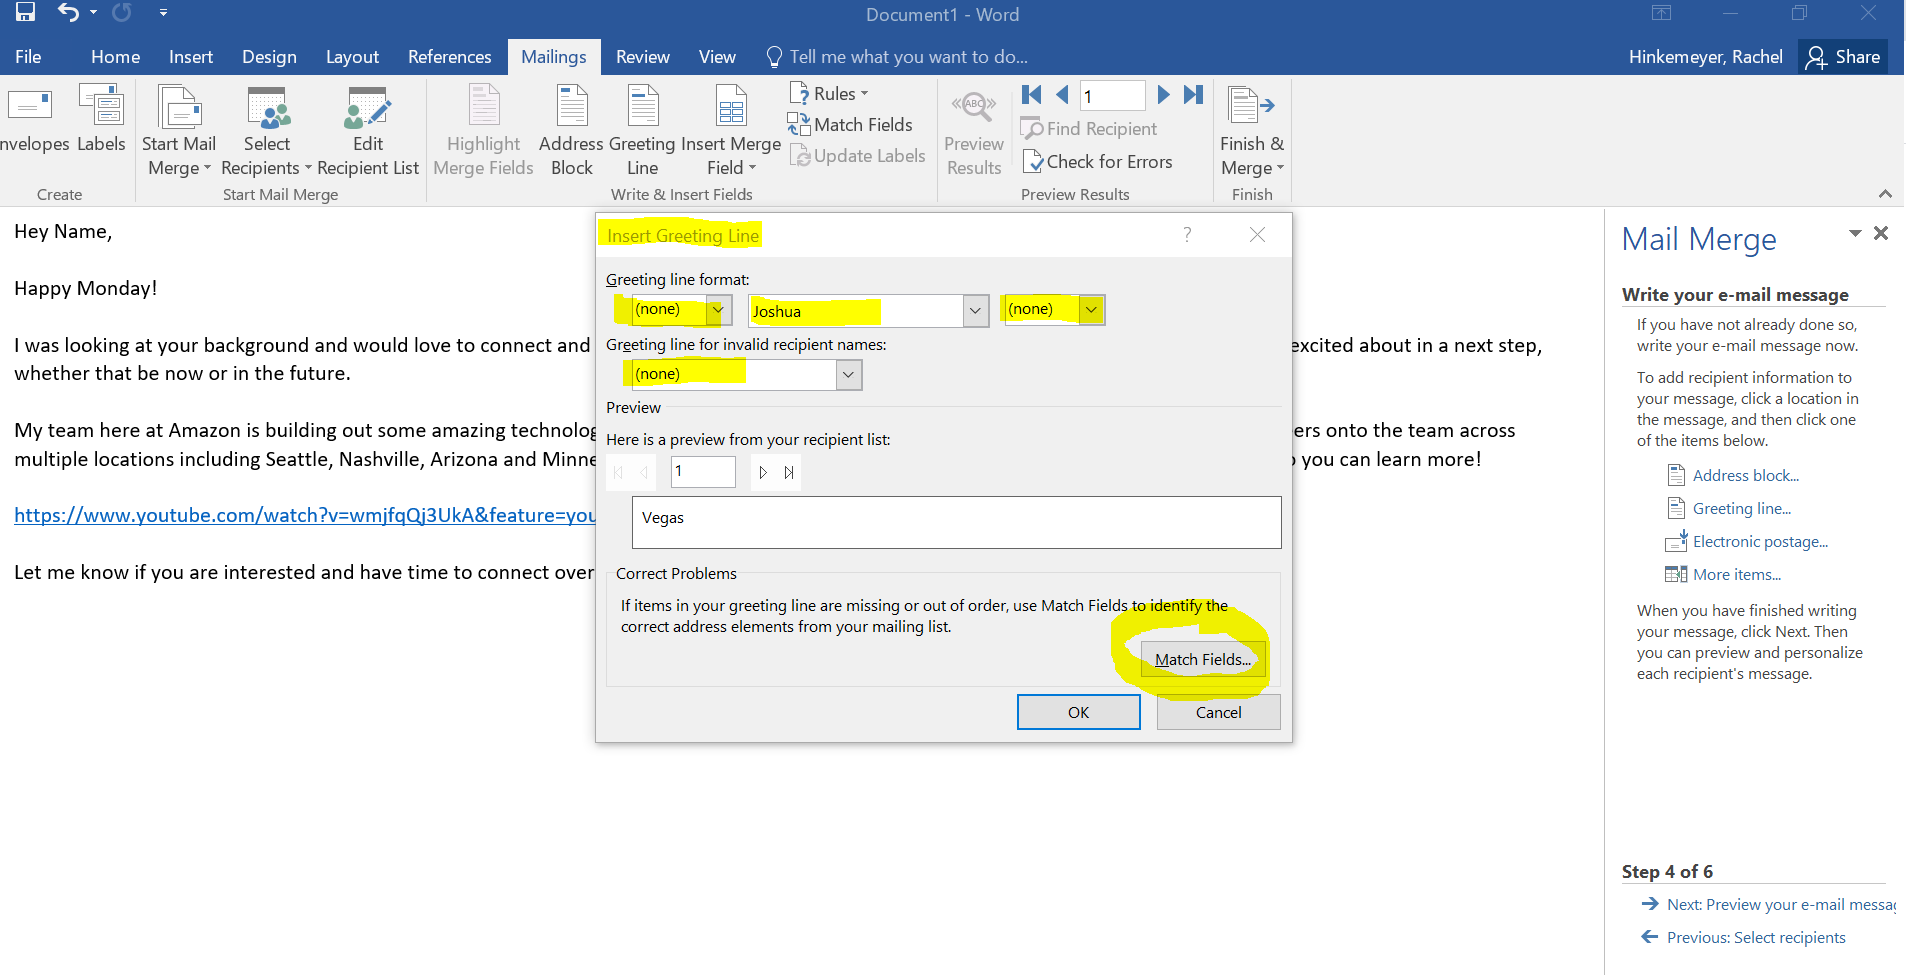
Under “Write your e-mail message” click “Greeting line…” A window titled “Insert Greeting Line” will then pop up where you can choose your preferences. Because in the example template “Hey” is already included as the greeting and a comma is also already included after “Name” I will choose “(none)” for both of these options in addition to “Greeting line for invalid recipient names”. For the person’s name I chose the full name “Joshua.”
After you have these selections made BEFORE you hit OK, click on “Match Fields.”
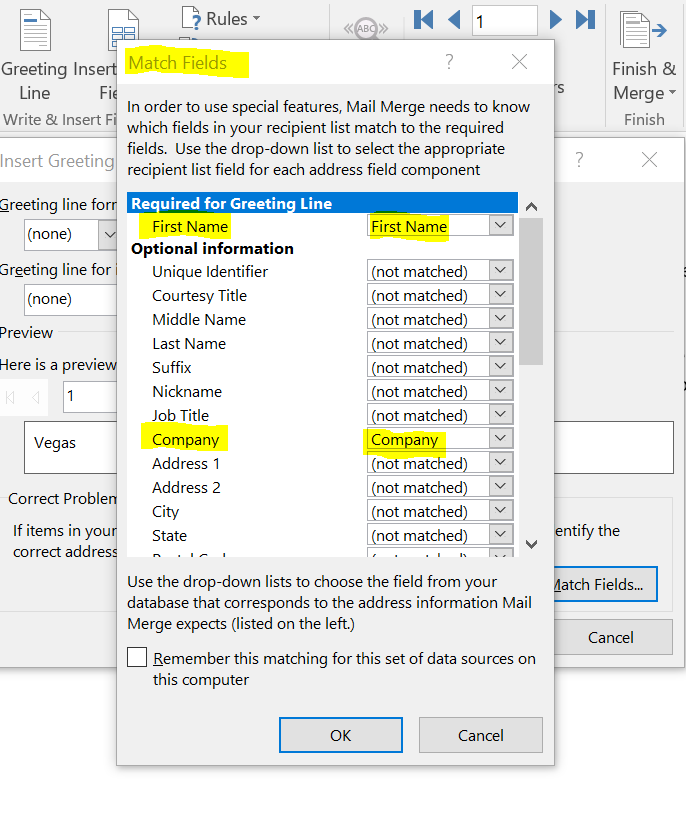
Once you hit Match Fields, a window will pop up titled “Match Fields.” This is a very important step to ensure the fields in your excel spreadsheet convert over accurately to the word doc template (in this example we would be look to make sure name, company and email match). Check all personalized fields to assure the columns on the left hand side match the ones on the right which represent your excel sheet. Scroll down to assure email matches as well. Hit, “OK.”
Once you hit “OK” a “GreetingLine” field will appear wherever you have your cursor so be sure to place it next to “Name” at the top of your template. This is the field that will populate each candidate name from your excel spreadsheet. Go ahead and delete the “name” text as this field will populate by itself.
Next, we need to insert a field to populate the “company” column in our spreadsheet. Make sure your cursor is by “company” on your word template. Click “More Items” on the right-hand column. A window will pop up titles “Insert Merge Field” and you will want to select “company” and then hit “insert.”
Once you have done this, close out of the window and you will see that a “company” field has populated where you had your cursor. Delete the company text next to the field as this field will populate each candidates company per the column in the spreadsheet. Now that we have our email populated with the correct fields we will move on to Step 4.
Step 4: On the bottom right of the screen (Step 4 of 6) click “Next: Preview your e-mail message”
Once you hit preview you will see that your email template will be populated with the first candidates name and company information. In the top right column you can click through each one of your recipients to preview how each email will look and assure the information has populated correctly before moving on to the next step.
Step 5: On the bottom right of the screen (Step 5 of 6) click “Next: Complete the merge”
You will then click “Electronic Mail” under the Mail Merge tab on the right hand side. A window will pop up with message options which should look as follows:
To: Email
Subject Line: Input your own email subject line that will appear on all emails sent to candidates
Mail format: HTML
Send records: ALL
BEWARE – Once you hit “OK” the emails will begin to send so make sure everything is how you want before you hit the OK button!
Step 6: All Done! Go to our Outlook account to see the emails all sent 🙂
Tips for Success
As with any new tool or feature, it may take some playing around with mail merge to get it perfect and to understand all you can do with it. The best place to start is by typing up a template, or perhaps just grabbing a version of an email you recently sent, and then playing around with your data file to see all the placeholders you can come up with.
As a recruiter, you can easily populate a data file automatically by using the information you already scrape from LinkedIn and other websites about your candidates. For instance, beyond their name, you might put in details about the company they work for, their current title, where they went to school, and so on.
Once you have your two files created, go ahead and see how mail merge works. To save you time, it even gives you a “Preview” option before you prompt it to generate all the personalized versions, so make use of that to avoid errors.
 |
New Book Launching SoonMy mission is simple: Help Recruiters learn about the latest Talent Sourcing Tools on the market! |
Recommended Reading:
Boolean Hacks to Source Diverse Talent
How to Use Evernote as a Recruiting ATS
Review of Vettery a Marketplace Hiring Platform

- Unlocking the Power of Perplexity AI: Why Recruiters Should Utilize This Revolutionary Tool - February 11, 2024
- Exploring AI Interviewing Assessment Tools: A Comprehensive Review - November 30, 2023
- PartyRock a Sandbox for Talent Sourcing - November 29, 2023
3 Comments on “How to Use Mail Merge to Recruit Candidates”