

To successfully recruit candidates, engagement is key. Recruiters must target potential candidates and send them a message that creates interest in job openings. Therefore, mastering mail merge is crucial for long-term success in sourcing. The significance of recruiters using mail merge effectively cannot be overstated. By personalizing messages and automating outreach efforts, recruiters can improve the likelihood of attracting and engaging the right candidates, while saving valuable time and effort.
What is a Mail Merge?
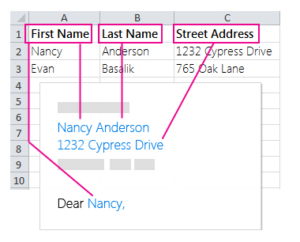
Mail merge is a process of combining a template document with a data source to create customized copies of the template document, where each copy includes personalized information from the data source. This technique is often used for creating a large number of personalized letters, emails, or labels. The data source typically contains a list of recipients’ names, addresses, and other details that can be inserted into the template document using placeholders. The resulting merged document can be printed, emailed, or otherwise distributed to the recipients.
Mail Merge in Microsoft Word:
Here’s a step-by-step guide to set up a mail merge in Microsoft Word:
1. Start with a new, blank document in Microsoft Word.
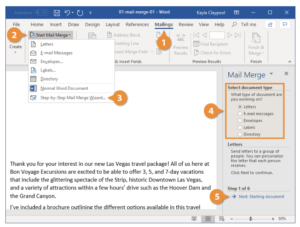
2. Click on the “Mailings” tab in the top menu bar.
3. Click on the “Start Mail Merge” button, and select “Step-by-Step Mail Merge Wizard” from the dropdown menu that appears.
4. In the “Mail Merge” pane that appears on the right-hand side of the screen, select the type of document you want to create (e.g. letters, email messages, labels, envelopes).
5. Click the “Next: Starting document” button.
6. In the “Starting document” pane, choose whether you want to use the current document or start with a new one, and click the “Next: Select recipients” button.
7. In the “Select recipients” pane, choose the source of your recipient list. You can choose to use an existing list (e.g. an Excel spreadsheet), type a new list, or use an Outlook contacts list. Follow the prompts to select and import your recipient list, and then click the “Next: Write your letter” button.
8. In the “Write your letter” pane, compose the body of your letter. To insert fields that will be personalized for each recipient (e.g. their name, address, etc.), click the “Insert Merge Field” button and choose the field you want to insert. Repeat this step for each field you want to include in your letter. When you’re finished, click the “Next: Preview your letters” button.
9. In the “Preview your letters” pane, review your letter to ensure that the merge fields are working correctly. Use the “Previous” and “Next” buttons to cycle through your list of recipients and check that the fields are populated correctly for each one. If you need to make any changes, click the “Previous” button to return to the “Write your letter” pane and make edits as needed. When you’re finished, click the “Next: Complete the merge” button.
10. In the “Complete the merge” pane, choose whether you want to print or email your merged documents. If you choose to print, you can also choose to preview the merged documents and/or edit the individual documents before printing. If you choose to email, you’ll need to have a compatible email client set up on your computer. Follow the prompts to complete the merge and print or email your documents.
That’s it! Just follow these steps and you’ll be able to set up a mail merge in Microsoft Word.
Mail Merge in an Excel Document:
Below are some guidelines to prepare your Excel spreadsheet for a successful mail merge:
1. Ensure that the column names in your spreadsheet match the field names you want to use in your mail merge. For instance, to address recipients by their first name, you will require separate columns for their first and last names.
2. Make sure that all data you intend to merge is present in the first sheet of your spreadsheet.
3. Format data entries with percentages, currencies, and postal codes correctly in the spreadsheet to enable Word to read their values accurately.
4. Store the Excel spreadsheet that you want to use for the mail merge on your local computer.
5. Make all necessary changes or additions to your spreadsheet before connecting it to your mail merge document in Word.
6. Note that you can import data from a comma-separated value (.csv) or a text (.txt) file and use the Text Import Wizard to build a new spreadsheet. For more information, refer to “Prepare your Excel data source for mail merge in Word.”
After preparing your spreadsheet, follow the steps below to connect and edit your mailing list, insert a merge field, preview and finish the mail merge, and save it for future use:
1. Connect to your data source and choose “Edit Recipient List.”
2. In “Mail Merge Recipients,” clear the checkbox next to the name of anyone who should not receive your mailing.
3. Insert one or more mail merge fields that pull information from your spreadsheet into your document.
4. Preview the results to confirm that the content is satisfactory, and then complete the merge process.
5. Save the mail merge document to maintain the connection to your data source for future use.
Using Outlook contacts as a data source for a mail merge:
To utilize Outlook’s mail merge feature and remain connected, follow the steps below:
1. Open Outlook and go to Contacts.
2. Choose the names you want to include, or skip this step to use the entire address book.
3. Click Home > Mail Merge.
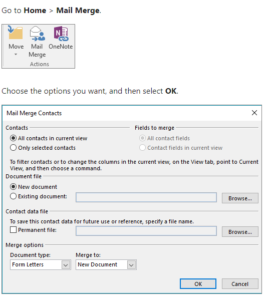
4. Select the options you prefer and click OK. If you plan to reuse the same set of contacts, choose Permanent file and give the list a name.
5. In Word, on the Mailings tab, insert merge fields that pull information from the Outlook contacts list into your document. The Address Block merge field is suitable for envelopes and labels, while Greeting Line is great for personalizing letters and emails.
6. Add any desired text to the documents, envelopes, labels, or emails, such as the body of a form letter.
7. Preview the results and navigate through each personalized document, envelope, label, or email using the Next or Previous record button for mail merge preview results.
8. To finish the merge, choose Finish & Merge in the Finish group, and then click Print Documents or Send E-mail Messages.
9. Save the merge document to reuse it without resetting anything up. The merge document will remain connected to the data source.
10. When you want to run it again, for instance, for another batch of envelopes to the same people, open the document in Word by selecting File > Open and then choosing Yes when prompted by Word to maintain the connection.
Doing a Mail Merge in Google Documents:
The Mail Merge for Google Docs™ & Google Sheets™ add-on is a free and straightforward way to generate documents, letters, emails, and print envelopes. It lets you export to PDF, Word, or print right within Google Docs™ without any advertising or watermarks.
This add-on is ideal for mail merging documents within Google Workspace™ and allows you to create hundreds of personalized emails, letters, and envelopes from a mailing list, as well as merge documents like reports, certificates, and more. The Mail Merge Wizard guides you through the process of creating merged documents in Google Docs™ from a Google Spreadsheet mailing list.
How to use the add-on tool:
Mail Merge is a technique used to create personalized batches of documents for each recipient, such as a form letter that addresses each recipient by name. A data source, such as a Google Sheets™ spreadsheet, is associated with the document, and placeholders, known as merge fields, are used to tell Google Docs™ where to include information from the data source. This makes it possible to merge emails, letters, envelopes, or labels.
To create a mail merge document in Google Docs™, follow the steps below:
- Open Google Docs™ (https://docs.new)
- Create a template document, such as an empty invoice template or a student grade report.
- Click on the Mail Merge button in the right sidebar.
- Choose the document type, such as letters, envelopes, labels, or emails.
- Select recipients and choose which spreadsheet to pull data from in the sidebar.
- Insert merge fields to personalize each document.
- Generate the documents.
- Download them as Docs, PDF, or Word.
To create a mail merge from a Google Sheets™, follow these steps:
- Open Google Sheets™ (https://sheets.new)
- Click on the Mail Merge button in the right sidebar.
- Choose the document to merge and create a template document in Google Docs™ beforehand, such as an empty invoice template or a student grade report.
- Choose the document type, such as letters, envelopes, labels, or emails. The recipients will be the people listed in the current tab of Google Sheets™.
- Generate the documents.
- Download them as Docs, PDF, or Word.
Mail Merge for Google Docs™ is a free alternative to other mail merge tools, such as Yet Another Mail Merge (YAMM), Gmass, Mail Merge with Attachments, and Mailmeteor. It comes with examples of mail merge letters and various templates, such as a birthday invitation, form letter, resume, annual report, certificate, and Google Docs™ templates for students.
Mail merge with Gmail & Google Sheets using a script:
To use this solution, you first create a Gmail draft template with placeholders that match the data in a Sheets spreadsheet. The column headers in the sheet serve as placeholder tags. A script then sends the information for each placeholder from the spreadsheet to the corresponding location of the placeholder tag in your email draft.
This solution utilizes the following Apps Script services:
- Gmail service: retrieves, reads, and sends the draft email to your recipients.
- Spreadsheet service: fills in the email placeholders with the personalized information for each recipient.
Before using this sample, make sure you have the following prerequisites:
- A Google Account (Google Workspace accounts may require administrator approval).
- A web browser with internet access.
To set up the script, follow these steps:
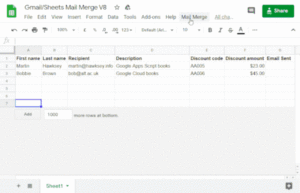
1. Create the Apps Script project by making a copy of the Gmail/Sheets Mail Merge sample spreadsheet. The project is attached to the spreadsheet.
2. In the copied spreadsheet, update the “Recipients” column with the email addresses to be used in the mail merge. You can also customize the data by adding, editing, or removing columns.
3. Create an email draft in your Gmail account and use placeholders that correspond to column names in the spreadsheet. The placeholders are enclosed in curly braces (e.g. {{First name}}). Note that placeholders are case-sensitive and must exactly match the column headers. If you format the text in the email, you must also format the placeholder brackets.
4. To run the script, click “Mail Merge” > “Send Emails” in the spreadsheet. If necessary, refresh the page to display the custom menu. When prompted, authorize the script and paste the email template subject line.
5. If you need to review the Apps Script code for this solution, click “View source code” here.
Using Chatpgt in your Mail Merge Outreach:
Cargo Tool
Are you struggling to personalize your emails at scale? What if you could create thousands of unique and personalized emails in just a few minutes? With the help of Cargo, a Google Sheets extension, and ChatGPT, an open-source language model developed by OpenAI, you can easily create unique emails without the hassle of crafting each one individually.
Cargo is a software add-on for Google Sheets that streamlines outbound organizations by retrieving company information, generating personalized email introductions, and cleaning data lists. To use Cargo with ChatGPT, you need to add the extension to Google Sheets and obtain an API key from OpenAI.
ChatGPT is an artificial intelligence model trained on a massive amount of text data that generates human-like text responses. It can be integrated into various applications to enable advanced language-based functionality and improve the overall user experience.
To integrate Cargo with ChatGPT, follow these simple steps:
- Install the Cargo extension from https://www.getcargo.io/ai-for-sheets.
- Sign up for OpenAI and obtain your API key at https://beta.openai.com/account/api-keys.
- Copy and paste your API key in the Cargo extension tab in Google Sheets.
- Start personalizing your outreach based on the input given to ChatGPT. The more input ChatGPT has, the more effective the personalization will be.
If you scrape your lead lists directly from LinkedIn using Sales Navigator and Phantombuster, you can use the LinkedIn bio column as input to get personalized icebreakers. To do this, follow these steps:
1. Open your Cargo Extension in Google Sheets and select the pre-made template named “Icebreaker Generator.”
2. Input the name of your LinkedIn bio column as a custom parameter using “{{” brackets. Be careful with spelling mistakes as the tool is case-sensitive.
3. Click on “Preview” to get a sample result before running the AI automation on your list. If the result looks good, click on the “V” in the upper-right of the add-on.
4. Select the rows you want to run the automation on and choose the column to display the results on. Click “RUN.”
Enjoy the results!
Using AI Personalization Tools:
Warmer.ai
Warmer.ai is an email personalization platform that leverages artificial intelligence to enhance user experience. The platform provides smart features to help you take your cold emails to the next level with AI-generated personalizations. Using information from your prospect’s LinkedIn profile and website, Warmer.ai’s AI produces highly personalized emails, even for large lists, to increase efficiency and reduce time constraints. The platform offers the latest features for personalizing cold emails using AI to improve response rates and sales for your business. With Warmer’s highly tailored emails, you can sit back, wait a few seconds, and watch your response rate soar. You can choose from a variety of options for your email’s objective, allowing you to tailor it to the best level possible. Additionally, Warmer.ai offers a customizable dashboard where you can handle all your operations in one place.

Final Thoughts..
Recruiters rely heavily on effective communication to attract and engage with job candidates. Mail merge is a powerful tool that can help recruiters send personalized and targeted messages to a large number of candidates, improving the chances of attracting and engaging the right talent for the right job.
Using mail merge well is important for recruiters because it can significantly improve the effectiveness of their outreach efforts. When used properly, mail merge allows recruiters to create customized messages that address candidates by name and speak directly to their interests and qualifications. This personalization can increase the likelihood of a candidate responding to a recruiter’s message and ultimately accepting a job offer.
In addition to personalization, mail merge can also save recruiters time and effort. Rather than sending individual messages to each candidate, recruiters can use mail merge to send a single message to multiple candidates, with personalized fields automatically filled in for each recipient. This saves recruiters from having to manually copy and paste information for each candidate, enabling them to reach out to a larger pool of candidates more efficiently.

Want to learn more about email campaign tools? Check out my other recent post (here)
Need more recruiter template examples? Check out my book titled: The Art of the Recruiter Message on amazon🔥
Recommended Reading:
Free Chrome Extensions for Recruiters and Sourcers in 2023
Hyperautomation will forever change the recruiting industry
How to prep your candidates for interviews
