NodeJS is one of the most used technologies for web development, but there are some misleading statements on the internet. It’s often said that NodeJS is an asynchronous single-threaded runtime, but it’s also been referred to as multi-threaded, which statement is then the correct one? Well, it depends.
It is widely known that Javascript is a single-threaded programming language, which may cause people to believe the first statement is empirically true.
This article will firstly dive into what asynchronicity and threading are, to later explore NodeJS’ Event Loop through an in-depth analysis.
Synchronous vs Asynchronous Languages
According to the Oxford English Dictionary, synchronous means “happening or existing at the same time”.
Let’s first remember that Javascript’s nature is synchronous. It can only do one thing at a time, although it has the ability to defer operations in its Event Loop using timers and events. This means that it can wait until a task is completed to get the result, and avoid blocking its only thread.
That behavior can be easily illustrated using timers, specifically setTimeout. Let’s take a look at an example of synchronous code:

This piece of code runs two tasks and prints the start of the process, finish of each task, and the end of the process to the console. The printed results will be:

And here is an example of asynchronous code:
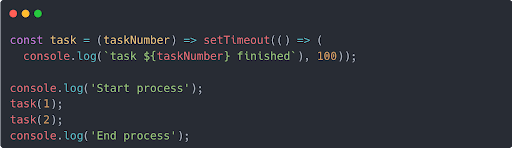
It could appear like not much has changed, but take a look at the task function. Now it returns a setTimeout, which will defer the execution of the console.log statement by at least 100ms.
We will shortly explain why it is at least and not exactly 100ms.
Let’s see what would be printed on the console:

Surprising? Not quite. This is Javascript in motion. The function task that now returns the setTimeout runs after the “End process” log statement. How is this? Well, as soon as the call to task was evaluated, the execution was queued into the Event Loop, and only executed when the result was ready 100ms later.
This ability to postpone code execution is crucial to Javascript; since it has only one thread, it can’t block the entire process because some result is not available or some asynchronous operation has not ended.
Single Thread vs Multi Thread
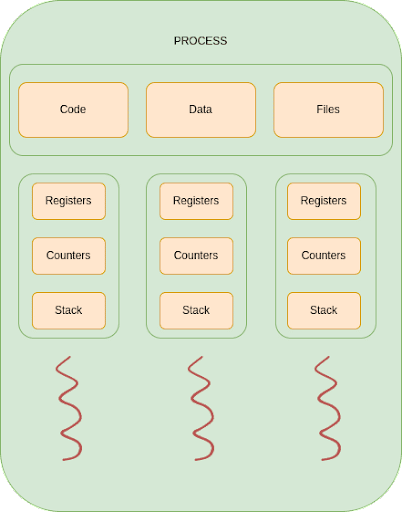
A process is an instance of a program being executed by one or many threads. It has its own memory space, files, call stack, register, and counters. It can be pictured as:
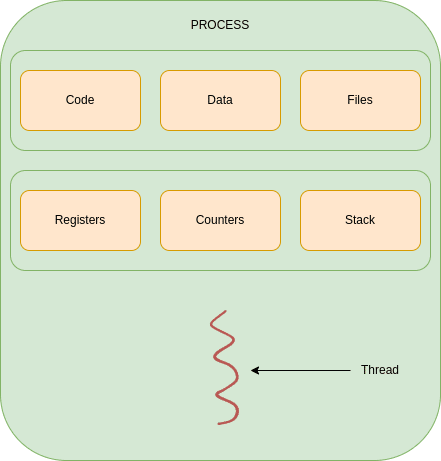
By default, a process will be a single threaded application. Thus, the program has only one memory space, one register queue, one call stack, and one counter queue.
In order to process things faster, one could spawn different processes to perform a task, which is called multi-processing:
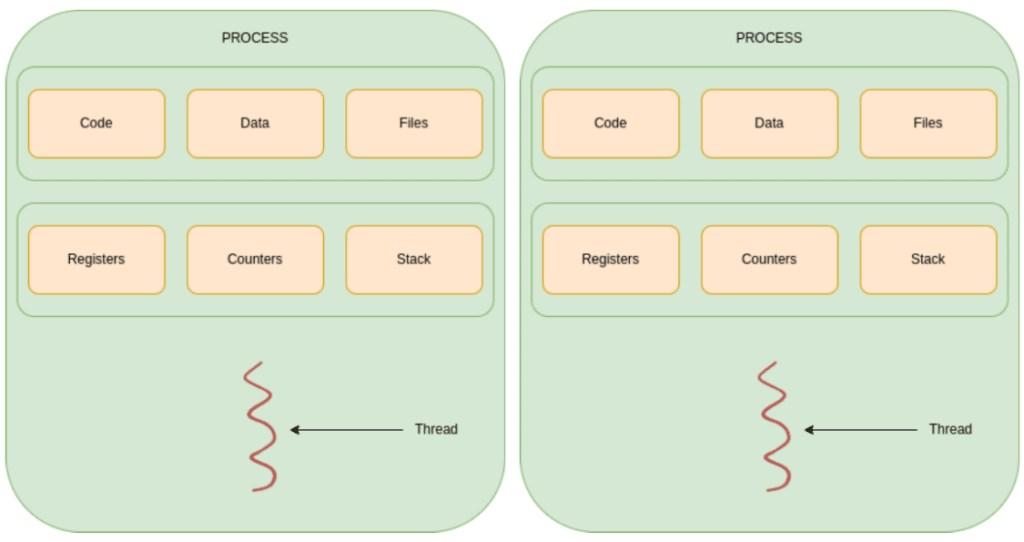
This way, a task can be executed twice at the same time. It may not make a lot of sense to run the same task twice, but imagine the need is to calculate two hashes. Why wait for one to finish when they can be calculated at the same time?
There is a better way to do it depending on the situation. In a multithreaded process, all threads will share the memory space or heap, but they will have their own register, stack and counters, allowing processing things in parallel but sharing the same application data as depicted in Figure 7: Multi Threaded Process, making communication between threads really fast, as opposed to multiple process having to use a dedicated mechanism to share data.
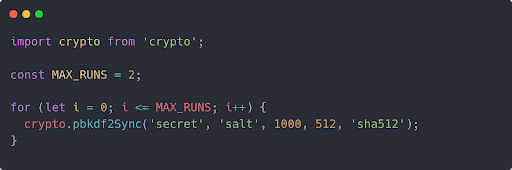
The use of threads in NodeJS is managed by the runtime environment (also by the developer through worker threads) and enables it to be more efficient for I/O, network and other time consuming tasks. It can be illustrated using the `crypto` library and some hashing functions.
The experiment scenario consists of a loop that will run a synchronous hashing function from the `crypto` module twice. The experiment will then be repeated for the same task but this time run asynchronously.
The time measuring, although it’s not represented in the code, has been done with process.hrtime. The graphics have been obtained with Octave.
Single thread (and sync function)
Timing the process produces the following results:
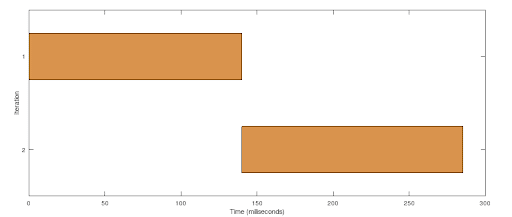
Since this program is using the synchronous version of pbkf2f, NodeJS blocks the execution until each call to the function returns. It’s noticeable that the second task (iteration 2) is starting right after the first one has finished, taking about the same time to complete. Nothing to see here, just a normal, sequential, ordered state of things.
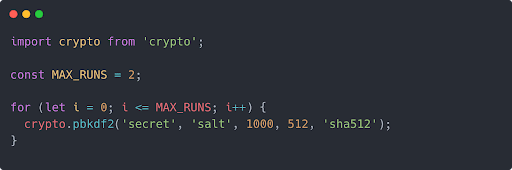
Let’s see what would happen if the program used the asynchronous version.
Multiple threads (and async function)
Below we can see the corresponding time results:
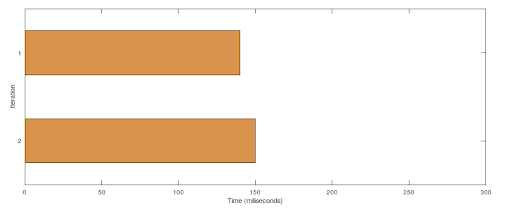
As the program performs an asynchronous call, NodeJS doesn’t need to block on each call, and can process the two tasks in parallel. That’s a pretty big improvement, half of the time for performing the same job. This happened because NodeJS used a second thread to run the second task. This applies not only to NodeJS, but to any language able to use threads, the only difference is that there isn’t any thread handling code here, Node did it by itself under the hood.
NodeJS provides synchronous and asynchronous functions for many of its Standard Library Functions and using one or another will change the behavior in terms of threading. By default, it will always try to improve its performance by using multiple threads, so it is highly recommended to use asynchronous functions whenever possible.
The Event Loop
So how does NodeJS utilize these concepts and implement them? And more importantly, why?
NodeJS was conceived as an alternative to ordinary web servers, developed to process each request in a different thread or other sort of context switching, which is very expensive from a hardware resource standpoint. As NodeJS creator Ryan Dahl states in the presentation of the runtime: “The right way to do concurrency is not to use threads for each connection, is to have a single thread and an event loop, so you do something and you are done with it. […] but that requires that what you do never takes very long.” It may seem a simple idea, but it changed the course of web development forever. Dahl’s motivation was to create an efficient runtime, by using a single threaded environment that abstracts the use of multiple threads for blocking operations.
It is important to note that NodeJS is written in Javascript but on top of C, which provides the speed and OS communication layer to the runtime. Approximately one third of the code is written in C. This is a top level representation of its components:
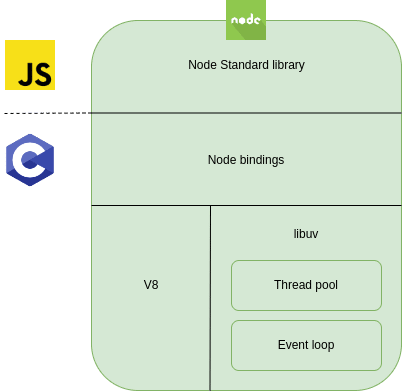
The concepts here are:
- The Node Standard Library is the exposed modules that the programmers will use to interact with Node.
- The Node bindings are C written modules to interact with lower level libraries such as libuv and the V8 engine.
- Google’s V8 is the high performance engine written in C++ and Javascript on which Node runs, providing memory allocation and garbage collection among other features.
- Libuv is a library written in C originally to support NodeJS but now used by other tools and languages. It creates a layer to interact with the kernel, enabling features such as: “‘handles’ and ‘streams’ provide a high level abstraction for sockets and other entities; cross-platform file I/O and threading functionality is also provided, among other things”.
Now that the components are depicted, let’s take a deeper look at the low level components and how they work.
Libuv contains two core components for NodeJS: the Event Queue and the Thread Pool. Tasks are pushed to the event queue and processed in a certain order depending on their nature. The thread pool is the component that handles the threads that will be used by libuv using callbacks to delegate the execution of blocking tasks, and get the results when they are done. Let’s take a look at a graphical representation:
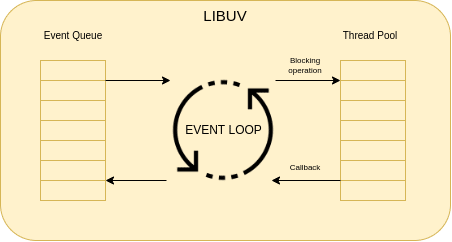
Here, code statements get pushed into the Event Queue by Node. Then the Event Loop iterates over that queue and decides which tasks should be executed. When a certain operation is blocking I/O, the Event Loop executes it in a context thread. This is quite simple reasoning that entangles a structured and ordered follow-to steps.
As stated above, the NodeJS Event Loop, as the name indicates, is a loop of events that runs indefinitely until the program finishes or is exited. Events, which basically are instructions on what to do, are pushed into a queue which is evaluated in a strict manner. But how does it handle timers, postpone operations or become capable of spawning threads for blocking operations? Let’s take a look at a graphical representation of the Event Loop phases:
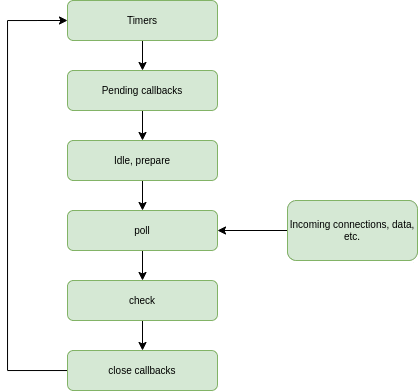
Each box here represents a phase (that is basically a queue), which will contain all the operations labeled by Node for that specific step. Let’s walk through these phases:
- timers: this phase executes callbacks scheduled by setTimeout() and setInterval().
- pending callbacks: executes I/O callbacks deferred to the next loop iteration.
- idle, prepare: only used internally.
- poll: retrieve new I/O events; execute I/O related callbacks (almost all with the exception of close callbacks, the ones scheduled by timers, and setImmediate()); node will block here when appropriate.
- check: setImmediate() callbacks are invoked here.
- close callbacks: some close callbacks, e.g. socket.on(‘close’, …).
A detailed description of these steps is available in the NodeJS Event Loop documentation.
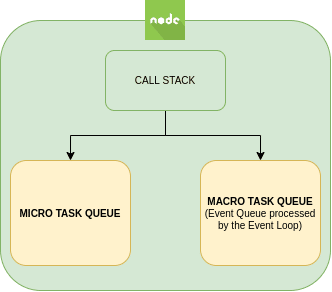
And that’s not all, as there is one more level of event queues. There is a missing part in this diagram: the nextTick and Promises queue, also called micro task queue. This queue doesn’t belong directly to the Event Loop. Getting into this in more detail could require an entirely separate article, but here is some information about nextTick(). Basically, it’s a double queue with preference over the other phases in the Event Loop that will be processed after each phase; prioritizing the nextTicks over the Promises.
The Event Queue where the instructions are pushed and iterated by the Event Loop itself can be called the macro task queue (or Event Queue as depicted in the Figure 13: Libuv and the Event Loop overview) as opposed to the micro task queue.
In the end, when executing code, NodeJS has two queues: the micro task queue and the macro task queue. Each statement will be pushed as an event into one or another depending again on its nature.
All this may not be very intuitive, but is there a better way to understand the functioning of something than with an example? Let’s create a program that utilizes all these concepts (timers, blocking I/O, close callbacks, etc.) to understand the Event Loop’s order of things.
This is getting a bit technical, although it’s not worth going into detail on all of the functions, here is some explanation on setTimeout, setImmediate and setInterval timers.
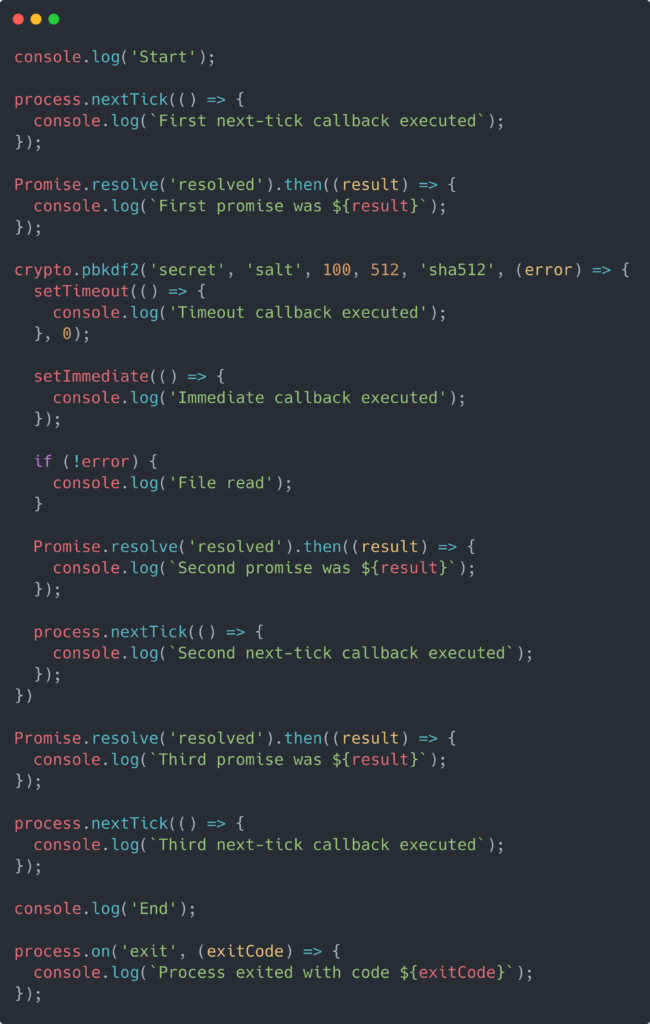
The output of that program would be:
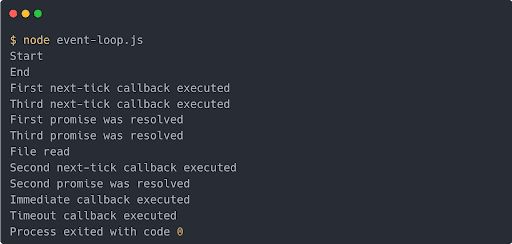
See how the output order doesn’t match the order in which statements were presented? This is because statements are processed in different phases of the Event Loop. Let’s see what happened in detail. The execution of this program develops in the following way:
- All synchronous calls execute, so “Start” and “End” are printed to the console. Then all the other statements are scheduled following the Event Loop diagram presented above. This will populate the queues for each step with the corresponding statements. I/O calls (crypto.pbkdf2) will go into the poll queue, nextTicks and Promises into the microTasks queue and the exit callback into the close callbacks queue
- Now that all the events are pushed into their queues, the Event Loop runs its first iteration. First it checks the timers queue, but it is still empty, so it moves to the next phase: the microTasks queue. This queue contains the two nextTicks and the two Promises. Since, as said before, the microTask queue runs after each phase and ticks have high priority, those will be executed first and then the promises. So it will firstly print the nextTicks and then the Promises results.
- The event loop moves to the I/O or poll phase and schedules the crypto.pbkdf2 callback.
- The crypto operation is finished and an event is emitted, which pushes its callback into the microTask queue. The loop continues but all the following phases’ queues are empty (except for the close callback which is listening for the exit event and not ready yet).
- The scheduled crypto callback is in the microTasks queue, which is executed, evaluating the inner statements and pushing them into their queues. The setTimeout goes into the timers queue and setImmediate will go into the check queue, and nextTick and the Promise into the microTask queue. It will execute the synchronous operation printing “File read” and continue with the following phases.
- There are new tasks into the microTask queue so they will be executed and print “Second next-tick callback executed”, “Second promise was resolved”, in that order.
- The Event Loops advances to the next phase, the check phase, where all immediate callbacks are executed. “Immediate callback executed” will be printed to the console.
- Now the second iteration starts running the first phase and processing the timers queue, thus “Timeout callback executed” will be logged.
- There aren’t any other elements in the phases’ queues until the close callbacks phase, which will execute the exit callback and print “Process exited with code 0”
The event loop can be experienced interactively in this sandbox.
This example was taken and adapted from zeroabsolute‘s GitHub. There are other great examples to understand how NodeJS works internally. Go check it out!
Conclusion and final thoughts
Through different mechanisms of asynchronicity and multithreading, NodeJS has achieved more efficient resource management for Web Servers. It is now widely used for the vast majority of new implementations, even outside the web platform, providing an easy entry level, a fast programming environment, abstract streaming and threading from the developer.
There is still one uncovered topic. How programmers can make use of multi-threading at their will. That process, by the means of worker threads, would be a separate technical article.
If you have questions regarding the article, or require additional information on the topic, or want to connect with one of our dedicated software developers, please reach out!
—
References
- NodeJS Event Loop
- Don’t block the Event Loop
- Ryan Dahl: Introduction to NodeJS
- Ryan Dahl: Original Node.js presentation
- Libuv Documentation
- Node-Internals Github Repo
Author:
 Víctor Igualada Calatrava is a Software Engineer focused on Backend development and DevOps. He is passionate about automation and structure, and he loves learning new things in full detail. Víctor is currently working with NodeJS and key-stores to produce high-frequency, low latency systems delivered with CircleCI, Terraform, and SaltState.